OPENING CAVEAT
So many people have been asking for this next part in the tutorial series and I apologise for not getting it done sooner. BUT there are valid reasons, so in the interests of full disclosure this is why its taken so long. The main reason is - ReactJS.net appears to not work very well with React 15.5 and above. Most of the reason for this delay is that I cannot get my tutorial repo to work with the versions of react that were used in parts 1-3. That said, it does work with earlier versions of React, so I thought it best right now to at least finish off the tutorial so you can see the Sitecore parts and then hopefully as a collective we can work out the issues with the newer versions of React.
Another big part of me is wondering about the benefit of this implementation of React with Sitecore now that JSS has gone into tech preview. So let me know if you think this module is still helpful to keep going or whether most of you will just move to JSS once it is available.
Episode 4 - A New Hope:
FINALLY!!! We have got to some Sitecore stuffs!! All the front end is in place now and we can start the integration into Sitecore.

This is the 4th tutorial in the series on Sitecore.React. If you have not read the previous 3 yet, start here: Sitecore.React - Getting Started - 1. Webpack first. This turorial is going to be pretty image heavy to get the Visual Studio part setup!
Lets get the Sitecore environment setup
For the purposes of this tutorial I will assume you are familiar with SIM and have the latest version installed. Using SIM install Sitecore with the following setup:
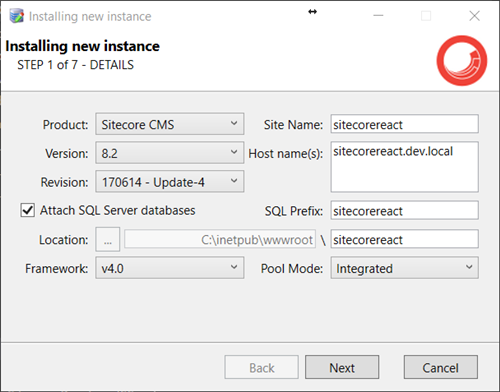
Once Sitecore is installed we need to install the Sitecore.React package. You can download this from the Sitecore Marketplace: https://marketplace.sitecore.net/Modules/S/SitecoreReact.aspx.
This package contains the Sitecore templates required to get up and running. Once installed you should see the following templates installed:

Note that the
React View Renderingis for a future version, it is not currently supported!
Visual Studio Setup
For this tutorial we are going to use Anders Laub’s awesome Visual Studio templates (https://marketplace.visualstudio.com/items?itemName=AndersLaublaubplusco.SitecoreHelixVisualStudioTemplates). If you haven’t used them yet and are building Helix based Sitecore implementations, then I guarantee you need to install them!
In Visual Studio, create a new project, find the Sitecore Helix Modules and Solutions, set the project name and folder setup as follows. Important - Make sure that the folder you select is the folder where you have been building your Sitecore.React front end project
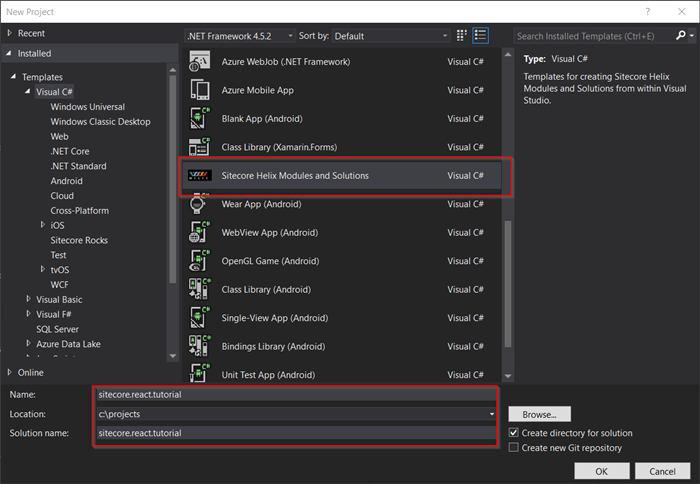
On the next screen, set the project up like this:
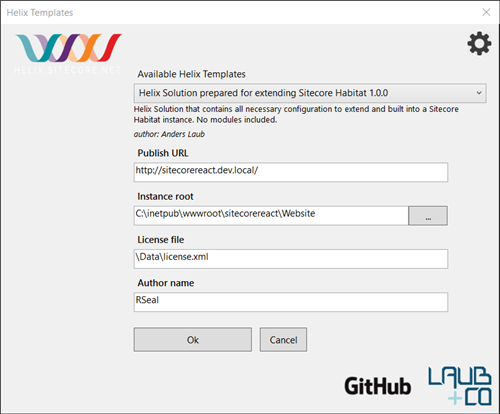
This will go away and setup all your solution, folders and gulp scripts etc… all along side your existing React application files.
Using the same templates, add a Project module, a Foundation module and a Feature module. Here are the values you should use for each:
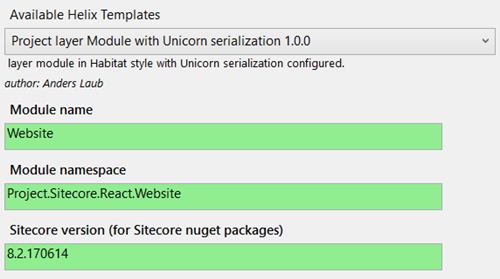
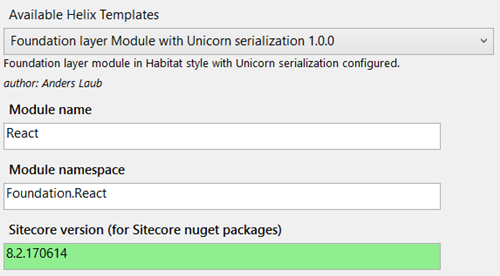
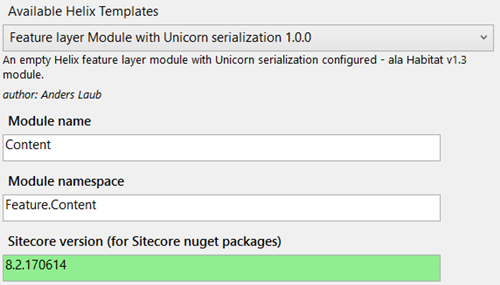
Once you have set all that up - your visual studio project should look like this:
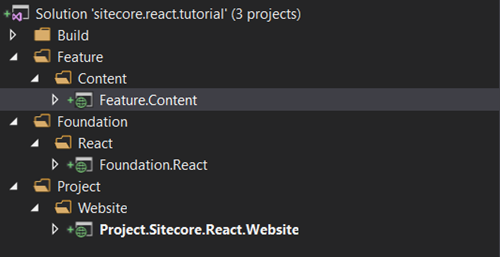
Alternatively, checkout the
gettingstarted-4branch in the tutorial git repository!
Setup Sitecore.React
Now we need to setup Sitecore.React and add the nuget packages. First in the Foundation.React project, add the Sitecore.React.Web nuget package:
1 | Install-Package Sitecore.React.Web |
For the other 2 projects, just install the Sitecore.React package:
1 | Install-Package Sitecore.React |
The .web version contains all the configuration files for Sitecore.React, so this should go into the foundation project.
Create a default layout
Once the references are all setup, we need to create a default layout for Sitecore. This will be the main layout that we use in presentation and the part where we add our react components. It replaces the index.html file from the react application.
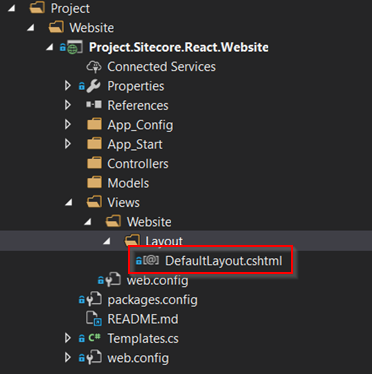
In the Project.Sitecore.React.Website web project, add a DefaultLayout.cshtml razor file to /views/Website/Layout:
In here we will copy the contents of the index.html file, but replace the app div element with a Sitecore placeholder. Also we are removing the front end script tag and adding in the script tag from the Sitecore.React module:
1 | @using Sitecore.Mvc |
A couple of things here that some have had problems with. Just because I used a single placeholder here and called it app doesn’t mean that you have too - Sitecore.React works just like a standard Sitecore MVC implementation. It has a layout and renderings for each page, renderings are added to placeholder keys - just like a regular MVC Sitecore application.
Now we need to create the Sitecore item. In the content editor, navigate to /sitecore/layout/Layouts/ Create a folder called Project and then create a new MVC Layout item called DefaultLayout. Make sure that the Path field is pointing at the razor view we just created.
Creating the Scaffolding
In our React application, the first component we created was the MainLayout.jsx component. This provided some scaffolding for the site. So lets create that one.
We already have our front end from the ReactJS application we created earlier, so we just need to create the backend. In the Project.Sitecore.React.Website Visual Studio project, lets create a controller for scaffolding elements. (In a proper solution, you may put these scaffolding components in the Common website project or maybe a feature project. We are just using the main website project here for the sake of time and ease of setting up the tutorial)
First create a ScaffoldingController class in Project.Sitecore.React.Website\Controllers - make sure it inherits from System.Web.Mvc.Controller. Then add an ActionResult, lets call it MainLayout. There is no need for a datasource for this component. We just need the controller rendering for now. Your action result will use the extension method React() to return;
NOTE: Currently view react renderings are not supported with the
Sitecore.Reactmodule. This is on the roadmap for a future enhancement.
Your controller should look like this:
1 | using Sitecore.React.Mvc.Controllers; |
Next create the React Controller Rendering item in /sitecore/layout/Renderings/Project/Website/MainLayout. You can leave the JSX File field empty for this. Fill in the Controller and Controller Action fields like this:
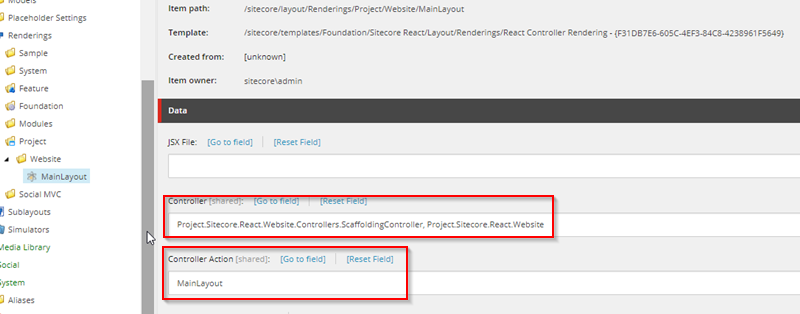
Notice that instead of returning this.View() we are using this.React() - this is the extension method that tells the application to use the React view engine instead of the razor script view engine.
Page Title & Body Components
Now we can get into creating some data driven components. Remember for our react application, we created Page Title and Page Body components. So lets create those in the Feature.Content project. First create a controller for the components, lets create ContentController, again make sure it derives from System.Web.Mvc.Controller.
We will create 2 ActionResult methods - PageTitle and PageBody. In this tutorial we wont use an ORM or Mapper, so we will hit the Sitecore API directly. In the Feature.Content Visual Studio project, lets create the controller and add actin result methods for both of the components:
1 | using System.Web.Mvc; |
So let’s again break down the 2 controller actions. If you are used to using the Sitecore API directly, this may look fairly familiar, React controller actions are almost identical to a standard MVC controller action. The first parts are fairly standard Sitecore, we are just getting the rendering item. Next we build the view model - here is where it gets a little different. In a standard controller, we might just add the Sitecore field to the view model, or Glass/Fortis/Synthesis model to our view model, and then use the FieldRenderer to render the contents of that field in the razor view.
The problem is that with React, we can’t put server side code into the jsx comonent. So we are using the FieldRenderer in the controller action and populating our view model with the rendered output of the field. This means that when rendered by React, we still get Experience Editor capabilities.
Now we need to create the 2 components in Sitecore - in your sitecore/Layout/Renderings/Feature/Content folder, create 2 React Controller Renderings - PageTitle and PageBody. Make sure that the controller and action fields are set with a fully qualified controller. This is what I have: Both renderings have the Controller field set to: Feature.Content.Controllers.ContentController, Feature.Content and then the Action fields set respectively.
Set the Presentation
Make sure you set some presentation and add the components to the app placeholder on the default layout.
Deploying the Code
Finally we can deploy the code. In the github repo I have setup some gulp tasks similar to the Habitat demo ones. There is an extra couple in there to handle deploying the JavaScript and JSX component files to the site.
Why are we deploying the JSX files?
All the JavaScript is in the webpack created files right? So why do we need to copy over the JSX files to the website instance?
Well, there are 2 main reasons for this:
- First, with the Sitecore.React componenet, it creates a new ViewEngine for ASP.NET MVC. The base view engine in MVC requires you to have a physical (or compiled) view file. It searches for the file and passes this through to the rendering engine of the view. To keep this following a standard MVC view engine pattern, the React View Engine, keeps this default functionality. So if the jsx file doesn’t exist, your component will fail.
- Secondly, to work out where Placeholder are created and also to render out the contents of a placeholder, the Sitecore.React module, parses out the content of the jsx file. This is much simpler to do in a jsx file with a single component in vs trying to parse the entire bundled Javascript file.
There may be better options for this in the future, but for now - we just need to get those files deployed.
What is next
Well as mentioned earlier, currently this only works with earlier versions of React, so I will be looking into that more if people find value in this module. Also JSS is in tech preview now - so more focus will be on that.
What do you want to see with Sitecore and React? Lets take the discussion to the Slack channels and see what the future holds!


