One of the questions that occurs in every Sitecore project, is where to keep your Sitecore dependencies! How to make sure they are kept up to date when upgrading etc…
Most developers go for the standard solution of having a libs or dependecies folder. But really this has a number of downsides. First it can bloat the repo, especially when upgrading and new versions are added. Also, it means that each new project must have that folder setup and the correct versions of the binaries added. Also, if you are using Git as your VCS, you need to update the .gitignore to make sure that no binary files are missed. It all seems a bit unnecessary in these days of package libraries!
Enter Nuget
When Nuget first came on the scene, it breathed life into the world of controlling project dependencies! Finally a package manager for .net! So why not use it for Sitecore?
While the Sitecore binaries are not public, it is relatively easy to setup an internal Nuget repository that can contain your Nuget packages. This gives a number of big advantages over keeping the Sitecore binaries in the repo.
- Reduces the size of the repo - no large binaries in there anymore
- Versioned packages - For each new version of Sitecore, the Nuget package only has to be built once. You no longer have to update a libs folder for every project, when it is time to upgrade, just upgrade the Nuget Package
- Targeted packages - Build the packages in to small units. Then it is simple for your projects to only reference the Sitecore binaries required.
- Build servers - Set the solution to Enable Nuget Package Restore on build, and your CI/CD build agents will just download the correct versions of your Sitecore dependencies for the project
How to do it?
Step 1: Create a local Nuget repository
There are some very good step-by-step instructions on how to host your own Nuget repository. There are a few options on where to host the Nuget repository. At Lightmaker we have our own internally hosted repository that is accessible to the internal network and all build servers. You could also host all the packages on a network share that is visible to everyone that needs it.
Once the repository has been created, each developer will need to add the new feed to the Package Sources under the Package Manager node in the Options dialog.
In the Name box, enter a name for your feed and in the Source box, enter the path of your feed. Either the local path or the url of your remote repo.
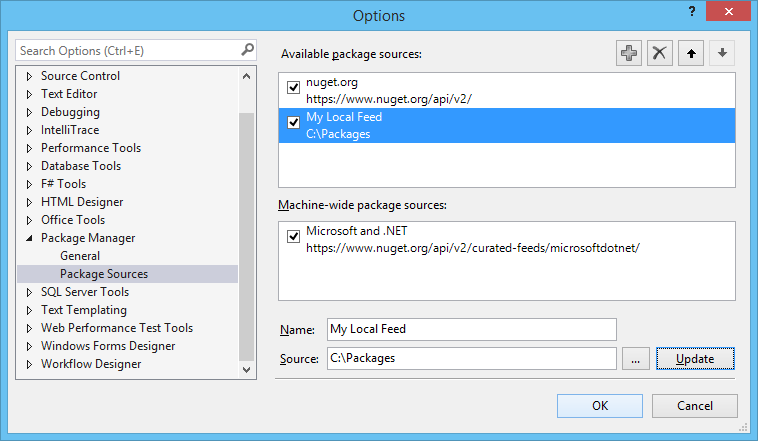
Click the Update button. You can now use this from the Package Manager console or the Manage NuGet Packages dialog.
Step 2: Create your Sitecore Packages
Next you need to create your Sitecore NuGet packages, I used Nuget Package Explorer to create the packages.
Sitecore.Core:
- Sitecore.Kernel.dll
Sitecore.Search
- Sitecore.ContentSearch.dll
- Sitecore.ContentSearch.Linq.dll
Sitecore.Mvc
- Sitecore.Mvc.dll
To cope with the different versions of the Sitecore binaries, the package version numbers are matched to the Sitecore release version.
Sitecore 8 Initial Release : 8.0
Sitecore 8 Update 1 : 8.1 etc…
Step 3: Add the Dependencies to Your Project
Now you can simply use the Nuget Package Manager to add the dependencies to your Visual Studio project.
Happy coding…
–Richard

